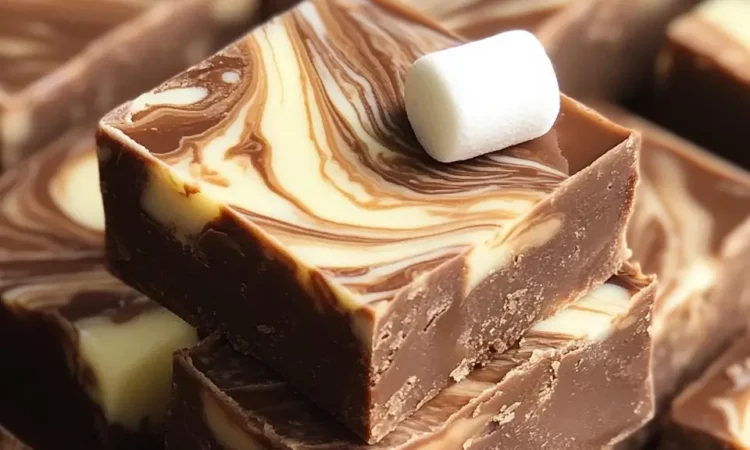
Indulge in a dessert that feels decadent yet is surprisingly straightforward. This Chocolate Marshmallow Swirl Fudge brings together rich semi-sweet chocolate, luscious sweetened condensed milk, and the marshmallow cream that creates ribbon-like swirls inside each square. It’s the kind of treat that makes you pause, take a bite, and go, “Wow.” Whether you’re prepping for a holiday spread, a cozy night in, or wrapping homemade gifts for friends, this recipe delivers big flavour with minimal fuss.
Below you’ll find everything you need: ingredient list, detailed instructions, pro tips, variations, storage guidance; and of course FAQs to help you nail it first try.
What You’ll Need
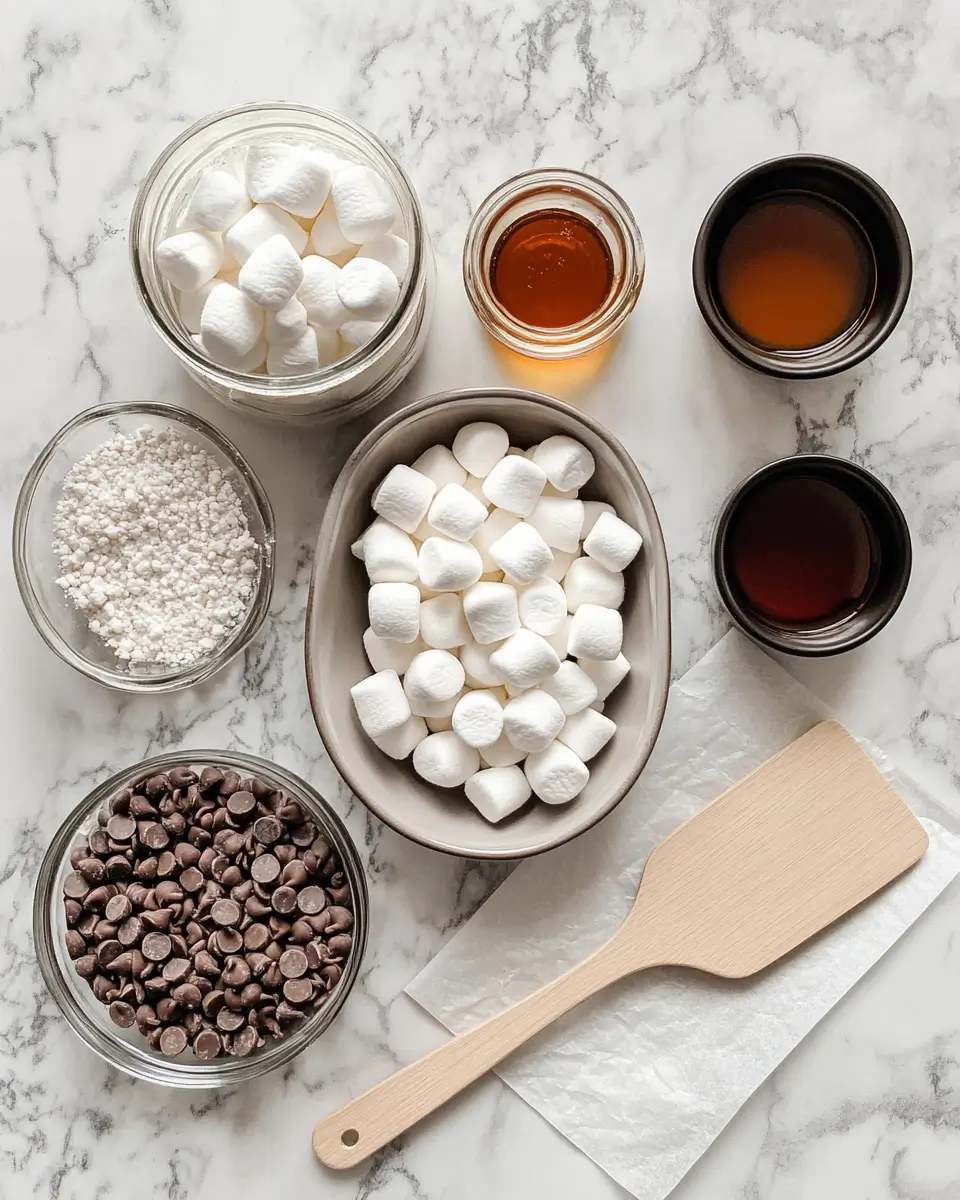
Ingredients
- 2 cups (≈340 g) semi-sweet chocolate chips
- 1 can (14 oz / ≈397 g) sweetened condensed milk
- 2 tbsp (≈30 g) unsalted butter, melted
- 1 tsp pure vanilla extract
- ¼ tsp salt
- 1 cup (≈240 g) marshmallow fluff (or marshmallow cream)
Tools
- Medium saucepan
- Spatula or heat-proof silicone spoon
- 8 × 8-inch (≈20 × 20 cm) baking dish
- Parchment paper (to line the baking dish)
- Knife (for swirling the marshmallow and later cutting the fudge)
- Cooling rack and storage container
How to Make It
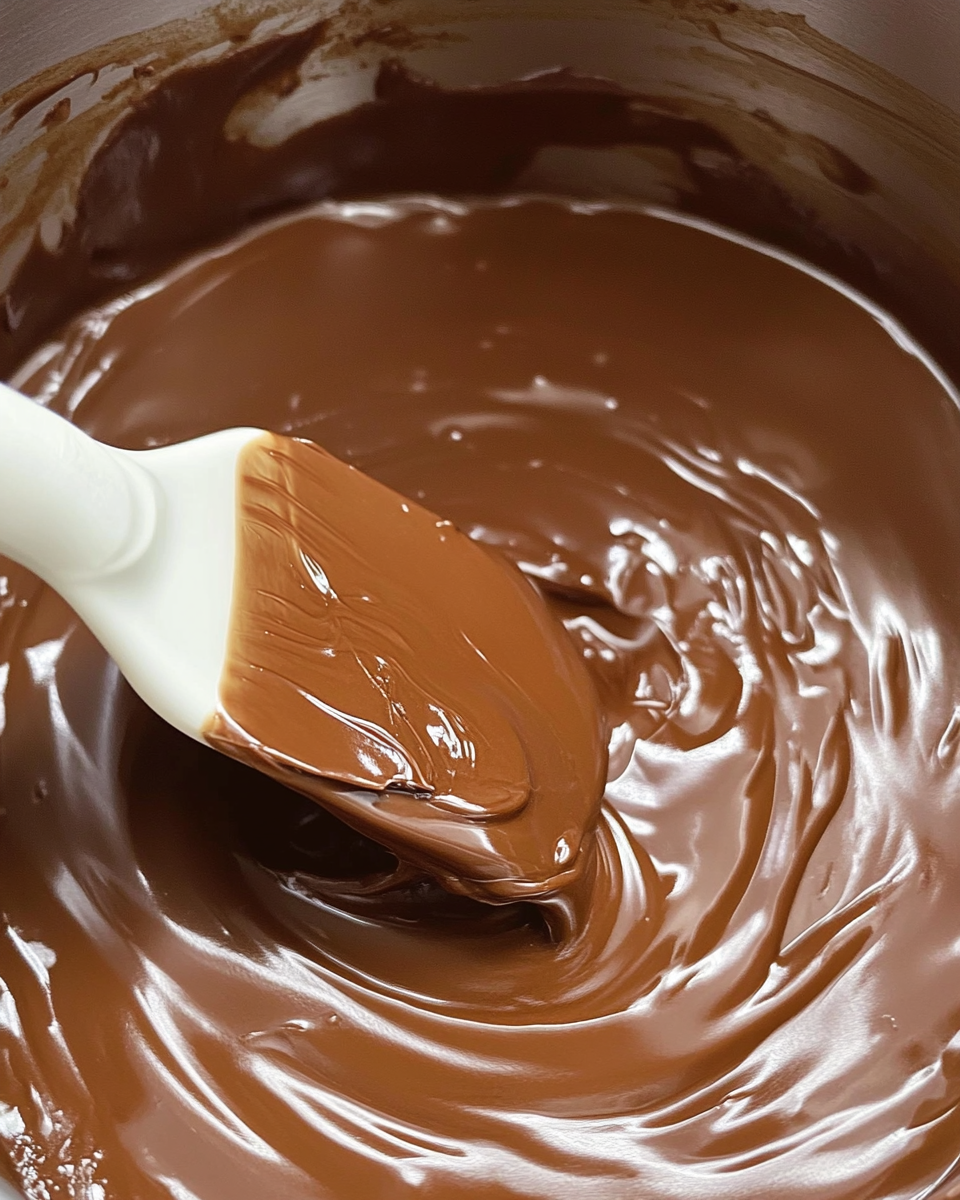
Step 1. Melt the chocolate base
Place the semi-sweet chocolate chips, sweetened condensed milk and melted butter into your medium saucepan. Use low heat and stir constantly until the chocolate chips are fully melted and the mixture is smooth and glossy.
Chef’s tip: keep the heat gentle to avoid burning the chocolate.
Step 2. Add vanilla and salt
Remove the saucepan from heat. Stir in the vanilla extract and salt until fully combined and the mixture is uniform in texture and sheen.
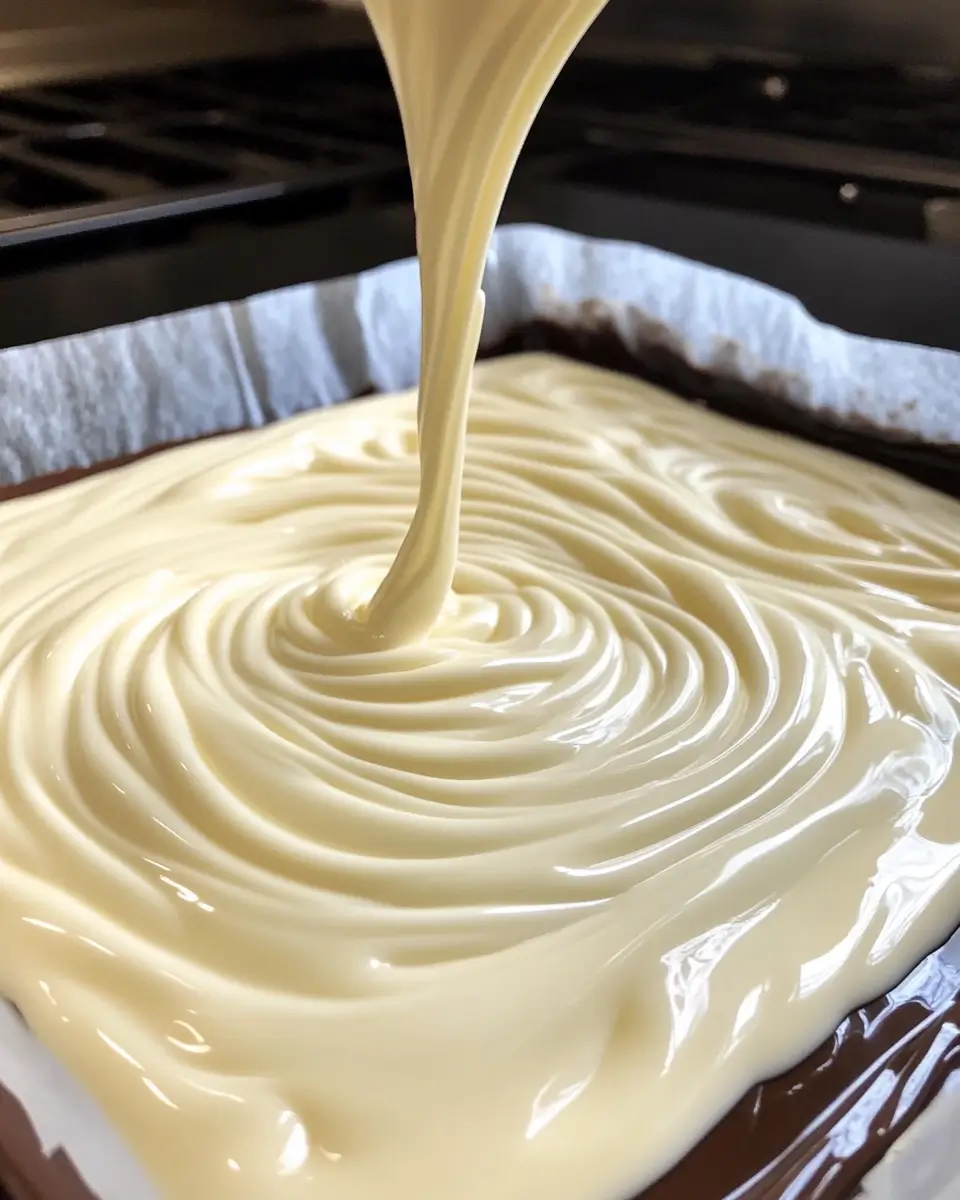
Step 3. Prepare the baking dish
Line your 8×8-inch baking dish with parchment paper leaving an overhang on the sides (this helps when lifting the whole fudge out later). Pour or spread the chocolate mixture evenly into the dish.
Step 4. Add the marshmallow swirl
Drop spoonfuls of the marshmallow fluff over the surface of the chocolate layer. Then, using the knife, gently drag through the marshmallow and chocolate mixture to create visible swirls. The goal is ribbon-like marshmallow streaks, not completely mixed in.
Step 5. Chill and set
Place the baking dish in the refrigerator for at least 2 hours (ideally longer) until the chocolate marshmallow swirl fudge is firm to the touch and easy to lift out. Chilling ensures clean cuts and a professional look.
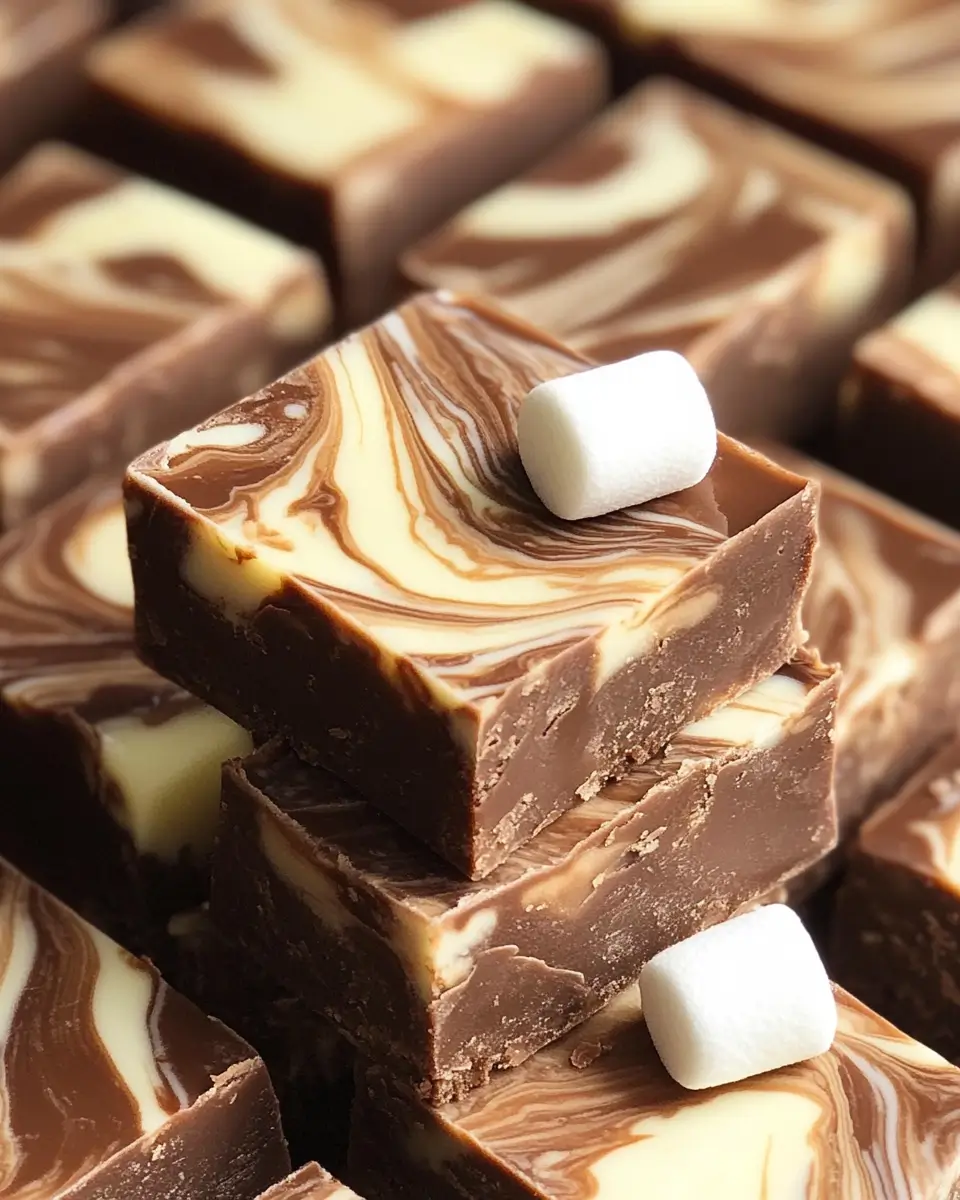
Step 6. Cut and serve
Using the parchment overhang, lift the hardened fudge block out of the dish. Place on a cutting board and cut into squares—approximately 36–40 pieces depending on size. Serve and enjoy!
Step 7. Leftovers & storage
Store your chocolate marshmallow swirl fudge in an airtight container in the refrigerator for up to 1 week. For longer storage, wrap individual pieces in plastic or wax paper and freeze for up to 3 months. Thaw in the fridge before serving.
Pro Tips
- Use marshmallow fluff instead of mini marshmallows: this ensures smooth, creamy ribbons rather than melting blobs.
- Don’t over-swirl: using a knife, gently drag just once or twice to keep distinct marshmallow ribbons visible.
- Chill completely: giving the chocolate marshmallow swirl fudge adequate chill time results in clean, sharp squares and optimal texture.
- Use a heavy-bottom saucepan to ensure even heat distribution and prevent scorching of the chocolate.
If you don’t have a candy thermometer, no worry—this method uses the melted chocolate/condensed milk base rather than requiring precise sugar-syrup temps. (Condensed-milk-based fudge tends to be more forgiving.)
Substitutions & Variations
- Dairy-free option: Use dairy-free semi-sweet chocolate, coconut-based sweetened condensed milk, and a plant-based butter substitute.
- Extra-chocolatey: After melting the base mixture, stir in ½ cup chopped dark chocolate before swirling in the marshmallow.
- Crunchy version: Before chilling, fold in or sprinkle on top ½ cup of chopped nuts (pecans, almonds) or crushed cookies for texture.
- S’mores version: Create a graham cracker crust by pressing 1 cup finely crushed graham crackers mixed with 2 tbsp melted butter into the bottom of the dish before pouring the fudge mixture. Then proceed with swirling marshmallow.
- Toasted marshmallow finish: After the fudge is set and cut, use a kitchen torch (or very brief broil) to lightly toast the marshmallow ribbons on top for a caramelized flavour.
Chocolate Marshmallow Swirl Fudge Recipe Details
- Prep time: 10 minutes
- Cook/melt time: ~5–7 minutes
- Chill & set time: 2 hours (minimum)
- Total time: Approximately 2 h 15 min
- Servings: Roughly 30–40 squares (based on 8×8 dish and size of pieces)
- Estimated calories per square: ~120–140 kcal (depends on size; adjust according to portion)
FAQs
- Can I use mini marshmallows in chocolate marshmallow swirl fudge instead of marshmallow fluff?
Yes, but the texture will differ. Mini marshmallows tend to melt into the chocolate base and won’t create defined swirls like marshmallow fluff will. For visible ribbon effects, fluff is preferable. - Is a candy thermometer required for this recipe?
Not necessarily. Because this recipe uses sweetened condensed milk and chocolate chips (rather than a raw sugar syrup boiled to a precise stage), it’s less dependent on exact temperature control. That said, using a heavy-bottom pan and gentle heat remains important for smooth texture. - Why did my chocolate marshmallow swirl fudge turn grainy or dry?
Graininess often results from sugar crystallization—stirring after the mixture begins to boil or using a pan with stuck sugar crystals can cause this. While this recipe avoids syrup-boiling, good technique still matters: Gentle heat and smooth melting help avoid gritty texture. Can I skip chilling in the fridge and set at room temperature?
Because of the marshmallow and condensed milk content, refrigeration helps ensure the fudge firms up nicely and cuts cleanly. Setting at room temperature may yield a softer, less well-defined texture.
4 How should I store leftover chocolate marshmallow swirl fudge, or if I want to make ahead as a gift?
Keep it in an airtight container in the refrigerator for up to one week.. For longer storage (up to 3 months), wrap individual squares tightly and freeze. Thaw in fridge before serving. For gifting, separate layers with parchment or wax paper to prevent sticking.
Final Thoughts
There you have it: a luscious batch of Chocolate Marshmallow Swirl Fudge that feels elevated yet remains impressively simple. The contrast between rich chocolate and dreamy marshmallow ribbons makes every bite a treat. Whether you’re sharing with friends, gifting at a special occasion, or sneaking a square (or three) late at night, this fudge hits the sweet-spot.
Enjoy the process, snap a photo (because let’s face it, it looks amazing) and then savour the result. Happy mixing and happy snacking!