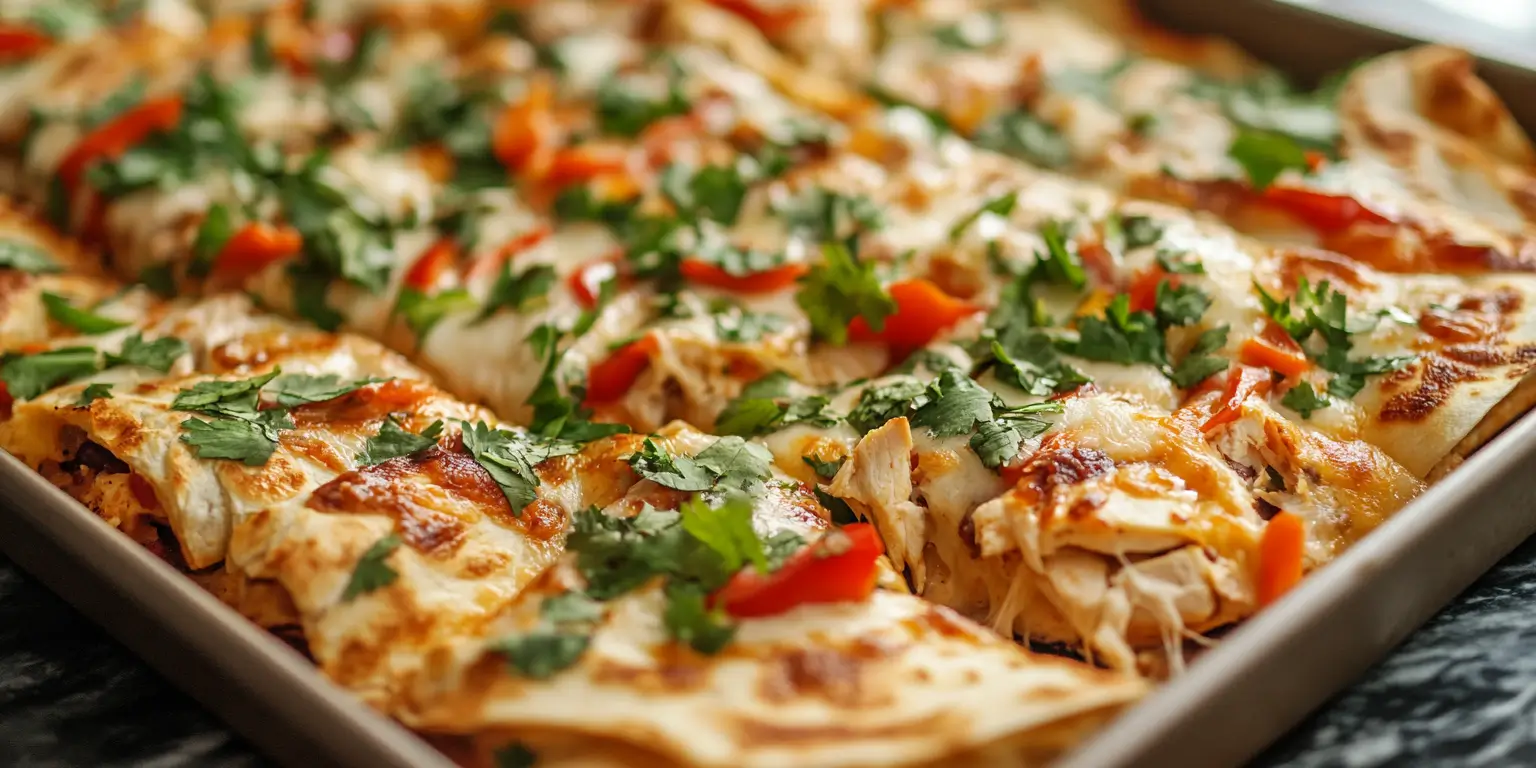
If you’re in the mood for a quick, easy, and oh-so-cheesy dinner that feeds the whole family, these Sheet-Pan Quesadillas are the answer! Perfectly crisp on the outside, filled with gooey cheese, tender chicken, and veggies inside, this is a one-pan wonder that brings everyone to the table. Ideal for a weeknight meal, game night, or when you just want a taste of something deliciously comforting without spending hours in the kitchen. With minimal cleanup and maximum flavor, this recipe will quickly become a family favorite. Let’s dive in and get this sheet pan sizzling!
Ingredients:
- 8 large flour tortillas
- 3 cups shredded cooked chicken (rotisserie chicken works great)
- 2 cups shredded Mexican cheese blend
- 1 bell pepper (any color, diced)
- 1/2 cup corn kernels (fresh, frozen, or canned)
- 1/2 cup black beans (rinsed and drained)
- 1/4 cup red onion (diced)
- 1 teaspoon ground cumin
- 1/2 teaspoon smoked paprika
- 1/2 teaspoon chili powder
- Salt and pepper to taste
- 1/4 cup chopped fresh cilantro
- 2 tablespoons olive oil
- 1/2 cup sour cream (optional, for serving)
- 1/2 cup guacamole (optional, for serving)
- 1/2 cup salsa (optional, for serving)
Instructions:
1: Prepare the Filling
- Preheat your oven to 425°F (220°C).
- In a large bowl, mix together the shredded cooked chicken, shredded Mexican cheese blend, bell pepper, corn kernels, black beans, diced red onion, ground cumin, smoked paprika, chili powder, salt, and pepper. Stir until well combined.
- Tip: Use rotisserie chicken for convenience or make your own by seasoning chicken breasts with salt, pepper, and olive oil, and baking until cooked through.
- For extra creaminess, you can add a couple of tablespoons of sour cream or cream cheese to the filling mixture. This will help bind all the ingredients and add an even richer flavor.
2: Assemble the Quesadillas
- Line a large baking sheet with parchment paper or lightly grease it with cooking spray.
- Arrange four tortillas so that half of each tortilla is hanging off the edges of the baking sheet. The goal is to form a continuous base that will fold over later.
- Spread the chicken mixture evenly over the tortillas on the baking sheet, leaving some space around the edges.
- Place the remaining four tortillas on top of the filling, overlapping to create a complete layer of tortillas.
- Tip: Be sure to press the tortillas down gently so that the filling spreads evenly across the surface. This ensures that every bite has a perfect balance of flavors.
3: Fold and Bake
- Fold the overhanging parts of the bottom tortillas over the top layer to enclose the filling.
- Brush the tops with olive oil to help them crisp up nicely in the oven.
- Place another baking sheet on top of the quesadillas and press down gently to flatten. This helps create that classic crisp texture.
- Bake in the preheated oven for 20-25 minutes, or until the tortillas are golden brown and the cheese is melted and bubbly.
- Tip: For extra crispiness, remove the top baking sheet in the last 5 minutes of baking. This allows the top tortillas to get direct heat and turn a beautiful golden brown.
- If you want a smoky finish, you can broil the quesadillas for an additional 1-2 minutes at the end, but keep a close eye to prevent burning.
4: Serve and Enjoy
- Remove from the oven and let cool for about 5 minutes before slicing. This resting time helps the cheese set a bit, making the quesadillas easier to cut and serve.
- Cut into squares or wedges and garnish with chopped fresh cilantro for a pop of color and fresh flavor.
- Serve with sour cream, guacamole, salsa, or any of your favorite toppings. A drizzle of hot sauce is also a great option for those who love some spice.
- Tip: You can create a toppings bar with different options so everyone can customize their own quesadilla slice to their liking. This is especially fun for kids or guests!
Notes & Variations:
- Vegetarian Option: Omit the chicken and add more veggies like sautéed mushrooms, zucchini, or even spinach for a vegetarian version that’s just as tasty. You could also add cooked quinoa or crumbled tofu for an extra protein boost.
- Cheese Lovers: Add extra cheese if you’re a fan of the gooey goodness. A mix of cheddar and pepper jack works great for an added kick, or try Monterey Jack for a super creamy melt.
- Spicy Twist: Add sliced jalapeños or a sprinkle of crushed red pepper flakes to the filling for a spicy kick. You can also mix in a tablespoon of chipotle in adobo sauce for a smoky heat.
- Taco Seasoning Substitute: If you don’t have individual spices, you can use a tablespoon of taco seasoning to flavor the filling. It’s a convenient way to add a blend of spices in one go.
- Breakfast Quesadilla: Swap out the chicken for scrambled eggs, and add cooked sausage or bacon along with cheese for a breakfast version. Serve with salsa and avocado for a morning treat!
Time Required:
- Prep Time: 15 minutes
- Cook Time: 25 minutes
- Total Time: 40 minutes
Nutritional Info (per serving):
- Calories: 380
- Carbs: 35g
- Protein: 25g
- Fat: 16g
- Fiber: 5g
- Sugar: 2g
Chef’s Notes:
Sheet-pan quesadillas are a game changer for busy weeknights or when you need to feed a group without the fuss. The beauty of this recipe is its flexibility—swap the fillings based on what you have on hand, and customize to suit your taste. Rotisserie chicken makes this extra convenient, but you can also use leftover steak, pork, or even shrimp if you like. For a vegetarian option, loaded veggies and beans do the trick just as well.
For even browning, pressing the tortillas with an extra baking sheet is key. It ensures even contact with the hot pan and gives you that beautifully crispy shell. If you’re cooking for kids, feel free to tone down the spices, or let them add their favorite ingredients. This dish is also perfect for a fun DIY dinner night where everyone can choose their fillings.
These quesadillas are also a fantastic option for parties or gatherings. You can easily double the recipe and make two sheet pans at once to accommodate larger groups. Just make sure you have plenty of toppings available—think pico de gallo, guacamole, different salsas, and even shredded lettuce for extra crunch. Guests will love customizing their own slices, and it turns a simple dinner into a fun, interactive experience.
Another great use for these sheet-pan quesadillas is meal prep. You can make a big batch and store the leftovers for easy lunches throughout the week. They reheat well in the oven or air fryer, keeping their crispy texture without becoming soggy. Just make sure to store any dipping sauces separately.
FAQs
- Can I make them ahead of time? Yes, you can assemble the quesadillas ahead of time and refrigerate them for up to 4 hours before baking. This is perfect if you want to get dinner prep done early and just pop them in the oven when ready. If making ahead, consider leaving the cheese layer a bit thicker to prevent any potential sogginess from the vegetables.
- What can I use instead of flour tortillas? You can use whole wheat tortillas, low-carb tortillas, or even corn tortillas if you prefer. Just make sure they are large enough to cover the sheet pan properly. If using corn tortillas, you may need to overlap them a bit more as they are typically smaller.
- Can I make this dairy-free? Absolutely! Use a dairy-free cheese substitute and skip the sour cream topping. There are lots of plant-based cheese options that can melt very good and still give that gooey texture. Cashew-based cheese or almond cheese works great if you’re looking for a creamy consistency.
- How do I store and reheat leftovers? You can keep leftovers in the refrigerator for two to three days. To reheat, place slices on a baking sheet and warm in a 350°F oven for about 10 minutes or until heated through and crispy. An air fryer also works great for reheating and brings back some of that crispy texture.
- Can I freeze the quesadillas? Yes, you can freeze them. After baking, let them cool completely, then wrap in foil and place in a freezer-safe bag. To reheat, bake from frozen at 375°F until warmed through. This is a great option for meal prep—just make sure to label and date them so you can keep track of freshness.
-
What sides go well with sheet-pan quesadillas? These quesadillas pair perfectly with Mexican rice, a fresh green salad, chips and salsa, or elote (Mexican street corn). A light side helps balance the richness of the cheesy filling. You could also serve with a bowl of tortilla soup for a more substantial meal.
- Can I use other proteins in this recipe? Definitely! You can substitute the chicken with ground beef, shredded pork, shrimp, or even scrambled eggs for a breakfast quesadilla twist. You could also use cooked chorizo for a spicy, savory option.
- How can I make the quesadillas extra crispy? For an extra crispy finish, remove the top baking sheet during the last 5 minutes of baking. You can also broil them for an additional minute or two—but keep an eye on them to prevent burning. Brushing the tops with a bit more olive oil can also enhance the crispiness.
- Are there gluten-free options for this recipe? Yes! You can use gluten-free tortillas to change this recipe to be gluten-free. Make sure to check all other ingredients, such as spices and beans, to ensure they are certified gluten-free as well.
- Can I add other seasonings to the filling? Absolutely! You can add garlic powder, onion powder, or even a bit of oregano for an Italian twist. Feel free to experiment with the spices you love.
-
How do I make the quesadillas kid-friendly? For a more kid-friendly version, reduce or omit the spices, and add extra cheese to make it super gooey. You could also let your kids help build their own quesadillas, choosing what ingredients they want inside.
- What other cheeses can I use? Aside from the Mexican cheese blend, you can use mozzarella for a milder taste, sharp cheddar for a stronger flavor, or Monterey Jack for extra creaminess. You can also mix and match to find your perfect cheesy combination!

